Thursday, March 29, 2012

Vegetarian for a Week - Day 4 - Roasted Beet Burgers


Hello everyone!

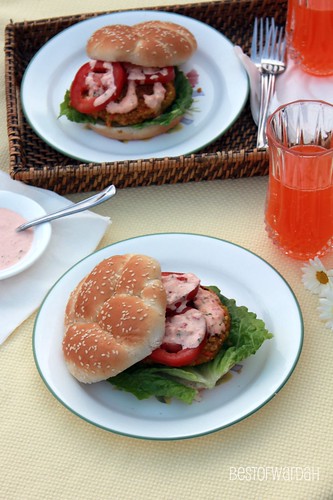
I'm just gonna do a short and sweet post today because it's pretty late.  I made roasted beet burgers today.  They were absolutely delicious and very healthy.  Though beet burgers cannot be fairly compared to beef burgers, they really do have some great points.  These version of beet burgers has loads of fiber and is light on the stomach while also quite filling.  It also has a great soft texture that you don't normally find in meat.  Best of all, it does not smell bad or overwhelming at all.  The smell of meat is the number one thing which totally ruins the experience for me.  Chicken can smell great, but red meat and seafood, especially when working with raw meat, can be completely overwhelming.

The only flaw I can find in these burgers is that they don't hold together very well.  They're very fragile and you have to be careful to help the patties remain shape while moving them to and from the frying pan.  Other than that, they are great!  I'm sure you will enjoy them if you try them. 

I also made thousand island dressing to top the burgers off with.  It was a great combination.  I'm leaving the recipe below so be sure to try that too. :)


Roasted Beet Burgers
Makes 8 patties


Ingredients
2 Tablespoons vegetable oil
3 small beets, scrubbed well (about 1 lb.), including 3-4 beet tops
1 medium yellow onion, peeled
1 medium carrot, peeled
2 cloves garlic, peeled
½ c. walnut pieces
1 cup raw millet
2 slices of whole wheat bread, lightly toasted
Salt and pepper to taste
Burger buns (8), condiments, lettuce, and fresh tomato

Step 1: Preheat the oven to 375 degrees F.


Step 2: Drizzle about 1 Tablespoon of the oil on a baking sheet. Cut the beets, onion, and carrot into quarters and place them on the sheet pan. Add the garlic and toss to coat with oil. Lightly season with salt and pepper. Bake until the beets are cooked, about 25-30 minutes, or until a knife enters the beet easily. Let the beets cool for at least 10 minutes. Carefully scrape off the peel


Step 3: Meanwhile, cook the millet. Bring 2 cups of water to a boil, and add the millet. Cook the millet for 30 minutes, covered, over very low heat. When the millet is finished, put it into a large bowl and let it cool for a few minutes.


Step 4: In a food processor, combine the walnuts, bread, garlic, pumpkin seeds, and wheat germ, if using. Process until the bread is a nice fine crumb texture. Add the mixture to the millet.


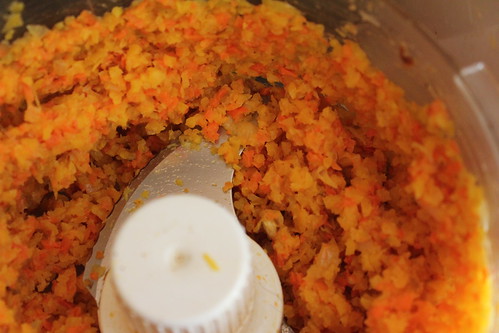
Step 5: Now add the vegetables to the processor and process until well chopped.


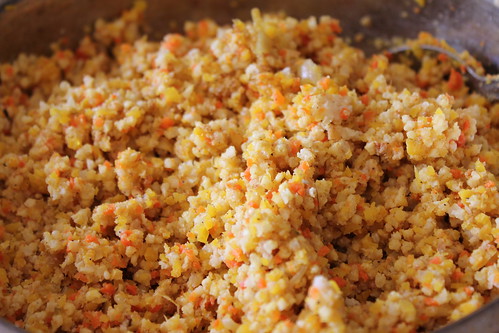
Step 6: Add the vegetables to the mixture in the bowl. Stir the mixture with a large spoon and season liberally with salt and pepper. When the mixture is thoroughly mixed, chill it for 45 minutes to 1 hour.


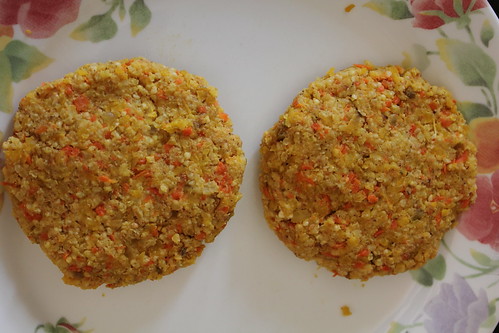
Step 7: Form about 8 burgers with your hands, packing each down to an even height. Do not form too thick or the result will be a very soft patty.


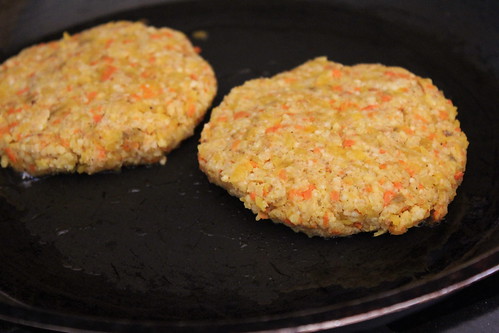
Step 8: To cook the burgers, heat the remaining 1 tablespoon of oil in a sauté pan, over low heat. Add the burgers. Do not move them once they are in the pan because this will cause them to fall apart. Let the burgers cook for a few minutes, then with a spatula, carefully flip them and continue cooking the other side until nicely browned.


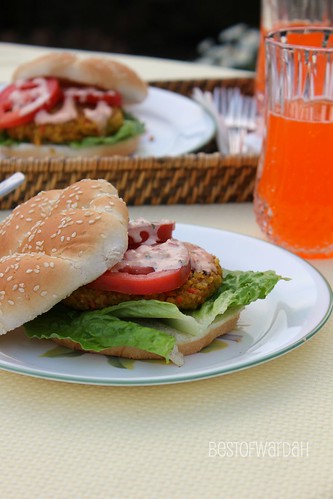
Step 9: Serve on a bun with condiments, lettuce, and fresh tomato slices.

That's all! Don't forget to make the dressing to go with it...


Thousand Island Dressing
Makes 1 cup


Ingredients
1/3 cup low-fat mayonnaise
2 tablespoons ketchup
2 tablespoons fresh lemon juice
2 tablespoons minced red bell pepper
1 tablespoon minced onion
1 tablespoon minced fresh parsley leaves
1 tablespoon sweet pickle relish
a pinch of cayenne
1/4 cup water


In a blender or food processor blend all ingredients and salt to taste until smooth, adding up to 2 tablespoons additional water if necessary to thin to desired consistency. Dressing keeps, covered and chilled, 1 week. Serve dressing with crisp lettuce, sliced tomatoes, or seafood salad.


Enjoy! P.s. I do recommend cutting them in half before eating the burgers.  It's just easier to handle.

Wednesday, March 28, 2012

Vegetarian for a Week - Day 3 - Fettuccine with Zucchini and Garlic


Hello everyone!

It's day three and all I have to say is that I'm really enjoying it.  I used to be really annoyed with the time I spent in the kitchen because it always seemed like most of my day was spent cooking while I could be doing other things.  Now, though, I really enjoy my time in the kitchen. As I get more experienced, cooking and cleaning is just so much easier and faster.  Really though, this cooking infatuation I have right now will probably not be expressed as much after this week because school will start then.  I'll be thrown right back into that vicious cycle of school and sleep.

The recipe I tried today is a Rachael Ray recipe for spaghetti with zucchini and garlic.  I replaced spaghetti with fettuccine and added more garlic and seasoning to the recipe.  These additions suited my tastes, but I'm sure both ways taste amazing.


Fettuccine with Zucchini and Garlic
Serves 4-6 people

Ingredients
3 small to medium zucchini
1/4 cup olive oil, 4 turns of the pan 
5 cloves garlic, chopped
Salt and freshly ground black pepper
1 pound fettuccine, cooked and set aside
1/2 cup grated Parmesan cheese

Step 1:


Pile up 2 or 3 layers of paper towels on a work surface.  Working on the paper towels, shred zucchinis using a grater holding the zucchini at an angle.  (I'm assuming the paper towels are used to soak up the water in the zucchinis.  However, I thought it was sort of a waste after I finished.  Try using 1 paper towel folded in half to conserve paper.)

Step 2:

 
Heat a large skillet over moderate heat.  Add extra-virgin olive oil to the pan.  Add chopped garlic to the oil. 


When garlic speaks by sizzling in oil, add shredded zucchini. Season zucchini with salt and pepper. Saute shredded zucchini 7 to 10 minutes. 

Step 3:


Add hot, drained pasta to the pan. Toss spaghetti with zucchini and garlic oil. 


Add a couple of handfuls of grated cheese to the pan. Adjust seasoning and serve.


This dish has a very exquisite taste.  The zucchini has a slight zing to it and the aftertaste of the olive oil is really unique.  I increased the quantity of zucchini in my version of this pasta because without the flavor of the zucchini, it is a bit lacking in flavor and bland.  I hope you all try it and enjoy!

Tuesday, March 27, 2012

Vegetarian for a Week - Day 2 - Broccoli Cheese Soup


Hello everyone!

It's day two of me attempting to be a vegetarian and let me tell you one thing that I have learned so far:  It is tough being a vegetarian in a family of meat eaters!  This is how the conversation at dinner with my family went yesterday:

Them: What are you going to eat, dude?  Come eat some chicken and rice with us!
Me: No can do, that's not vegetarian.
Them: Fine, eat some of this pasta.
Me: No. :(  It has some meat in it.
Them: Come on!  It's only a little..
Me: No thanks.
Them (talking to themselves): This chicken is sooo good right?  Delicious.  So tender.  Ooooh.
(to me): Why don't you just get some salad leaves and wrap it in chicken.  You can eat that...
Me: ..........


It went on like that for a while until I took my baked sweet potato out of the oven and joined them to eat.  It was only then that they stopped pestering me about my new found eating habits

Actually, the above conversation was the main reason that I decided to make broccoli cheese soup for today's recipe.  You should've seen the looks on their faces when they tried some of this amazing, delicious, vegetarian dish.  Pure bliss.  Need I say more?

Okay, I do realize that this recipe isn't exactly the healthiest one out there, but in my defense, I am still getting the hang of this whole vegetarian thing.  Plus, it was just one of those days when you want to make some soup and sit by a warm fire (despite the fact that, living in SoCal, I don't exactly have a functioning fireplace) and wrap yourself up in a blanket and get this warm tingly feeling in your stomach, you know?  But I promise all the recipes to come are healthier choices that taste pretty amazing.


Broccoli Cheese Soup
Adapted from Ree's Kitchen
Ingredients


1 whole onion, diced
1 stick butter
1/3 cup flour
4 cups milk
2 cups half-and-half
4 heads broccoli, cut into florets
1 pinch nutmeg
3 cups grated sharp cheddar cheese
small dash of salt
freshly ground black pepper

Step 1:


Melt butter in a pot over medium heat.


Then add the onions.  Cook the onions for 3 to 4 minutes or until they start to get translucent.  This alone smells super amazing. 


Then sprinkle the flour over the top. Stir to combine and cook for 1 minute or so.


Then pour in milk and half-and-half. 


Add nutmeg, then add broccoli, a small dash of salt, and plenty of black pepper.  Remember to only put a little salt because the cheese has more than enough sodium in it.

Step 2:


Cover and reduce heat to low. Simmer for 20 to 30 minutes, or until the broccoli is tender. Stir in cheese and allow to melt.
 
Step 3:


Taste seasonings and adjust if needed. Then either serve as is, or mash it with a potato masher to break up the broccoli a bit, or transfer it to a blender in two batches and puree completely, or, like I did, you could blend it with a hand blender.  Ree says that if you puree it in a blender, return it to the heat and allow to heat up again before you serve it.


Done.  Super easy-peasy, eh?  Enjoy!

Monday, March 26, 2012

Vegetarian for a Week - Day 1 - Potato Gnocchi with Tomato Sauce


Hello everyone!

I have some exciting news for you today.  I'm officially a vegetarian!

Hahaha, okay, I'm kidding; I'm not a vegetarian.  I can see the looks on some of your faces- "After you said that you could never be a vegetarian? I don't believe you!"  But while it is true that I am not a complete vegetarian, it isn't the complete truth.  I am actually going to try eating like a vegetarian for one week starting today.  Now let me explain why before you even start doubting me.
  1. One of the major reasons why I decided to try this out is actually for health reasons.  I have really started seeing an unhealthy trend in my food choices recently and I want to change that.  Though I know that avoiding meat is in no way making me healthier (I mean, think of all the french fries I could eat), vegetarianism is my personal step towards being healthier.  I know that with this step, I'll start limiting my food choices to unprocessed and not-fried items.  And I've taken enough nutrition classes in my college career to know that if you do it right, vegetarianism is an extremely healthful and beneficial option.
  2. I've recently been inspired by a couple people to become a vegetarian.  These ladies are beautiful, healthy, and successful women who have chosen vegetarianism and made it impossible for anyone to say that vegetarianism is unhealthy for you because they are living proof that it isn't.  One such women is Annette Larkins.  Watch her story and be inspired too!  Though I don't think I can ever follow her diet, I can take steps towards it (even if they only look like baby steps next to hers).
  3. Lastly, I've never been a major meat eater in the first place.  I can literally count the meat dishes that I enjoy on my fingers.  So, while I do really love my mom's amazing chicken sandwiches (I'll be sure to follow up with a recipe once this month is over ;D), I think I can give it all up for this week.
So, why a week, you ask me, and what's so special about this week?  A week only because it's long enough for me to try being a vegetarian and short enough for me not to give up.  After this week is over, I'll see how much I want to continue or not.

What's special about this week in particular is not that it's the last week of March. Oh no, it is not that.  This week is special because I will be posting an awesome vegetarian recipe every single day of this week until Sunday with thoughts and tribulations of my journey.  So you guys are in for a treat.  Because trust me, I have taken a vegetarian cooking class and vegetarian food is in no way boring!

So let's start this week up with a recipe for...


Potato Gnocchi with Tomato Sauce
Adapted from Ready, Steady, Spaghetti
Serves 4 to 6

Ingredients

tomato sauce:
1 tablespoon oil
1 onion, chopped
1 celery stalk, chopped
2 carrots, chopped
2 (14-ounce) cans crushed tomatoes
1 teaspoon sugar
salt, pepper, and any other seasoning (optional)


potato gnocchi:
2 1/4 pounds potatoes
2 tablespoons butter
1 1/2 cups all-purpose flour
2 eggs, beaten
seasoning (optional)

2 tablespoons finely grated Parmesan cheese, to serve


Step 1: To make the tomato sauce, heat the oil in a saucepan, add the onion, celery, and carrot, and cook for a bout 5 minutes, stirring.  Add the tomatoes and sugar, and season.  I seasoned mine with garlic powder, crushed red pepper, black pepper, and salt.  Bring to a boil, then reduce the heat to very low and simmer for 20 minutes. Cool a little, then process in a food processor until smooth. Just warning you that this is absolutely the best tomato sauce recipe you will ever try.


Step 2: To make the potato gnocchi, peel the potatoes, chop roughly, and boil until very tender.  Drain and mash until smooth.  Using a wooden spoon, stir in the butter, flour, and seasoning, then beat in the eggs.  Leave to cool.


Step 3: Turn out the gnocchi mixture onto a floured surface and divide into flour.  Roll each into a sausage shape.


Step 4: Cut into short pieces and press each piece with the back of a fork.  Cook the gnocchi in batches in a large saucepan of boiling salted water for about 2 minutes, or until they rise to the surface.  (Alternatively, just deep fry them until they float to the top or turn golden brown in color.) Using a slotted spoon, drain the gnocchi and transfer to bowls.  Serve with the tomato sauce.  Sprinkle with Parmesan cheese.


Mmmm, look at that amazing cheesy goodness.  I'm sure you'll love this recipe.  Enjoy!

If you have any experience being a vegetarian, please share in the comments below!  I'd love to hear your stories and advice if you have any.  Dinner today with my meat loving family was pure torture.

Sugarlicious Giveaway: Winner Announcement!


Hello everyone!

A couple weeks ago, I held a Sugarlicious book giveaway to celebrate 10,000+ views on my blog.  The giveaway ended yesterday and it is finally time for me to announce the winner.  The winner was picked through the random number generator website out of 28 comments in all.  This lucky person will receive a Sugarlicious book in the mail within the coming week!

And that lucky person is...

Congratulations Jory!

Jory please contact me by Wednesday night at my email address, warif93@gmail.com, with your shipping address.  If I don't get an email response, I'll have to use the generator to pick a different winner.  I will keep the rest of you updated on this very same blog post so keep checking back!

Everyone else, this was just the first of many more fun giveaways to come!  Thank you all for supporting me and I'll see you next time! :)

Sunday, March 25, 2012

Chicken Noodle Omelet


Hello everyone!

I've recently bought this cookbook and I'm totally loving all the recipes and gorgeous pictures it has in it.  Quite accordingly, I have already tried a couple recipes from the book, sticky date cakes being one of them.  The recipes are simple, fast, and taste delicious.  So, what recipe book is this?  You might be a bit surprised to find out that this cookbook is a book for cooking for kids.  That says quite a lot about my tastes. ;)

I just had to share the recipe I tried this time.  Yes, yes, by now you're thinking that you don't want to eat some food for kids, but let me tell you that this is the perfect recipe for college students (and people of all ages, of course).  Why?  This recipe has one ingredient that is a must in almost every college student's menu: ramen.  Told you.  So wipe that doubtful look off your face and read how to make this yummy breakfast food.


Chicken Noodle Omelet

Ingredients
1 packet of Maruchan ramen
1 cup chopped cooked chicken
2 teaspoons finely chopped parsley
2 eggs, lightly beaten
2 tablespoons grated Cheddar cheese
black pepper to season (optional)


Step 1: Cook the ramen as directed on the package.  Make sure to add the flavoring.  Drain well.

Step 2: Put the noodles, chicken, eggs, parsley, and pepper in a bowl.  Mix well.


Step 3: Put the mixture in an 8-inch nonstick ovenproof skillet. Cook for 5 minutes without stirring.


Step 4: Sprinkle with the cheese.  Put under a broiler for 2 minutes, or until the cheese is melted and slightly browned.  Serve hot.


I guarantee that you'll love having this for breakfast.  I recommend cooking the chicken the night before so you don't have to wait with your mouth watering the day of.  Enjoy!

© Best of Wardah. Made with love by The Dutch Lady Designs.