Hello everyone!
Our July 2012 Daring Bakers’ Host was Dana McFarland and she challenged
us to make homemade crackers! Dana showed us some techniques for making
crackers and encouraged to use our creativity to make each cracker our
own by using ingredients we love.
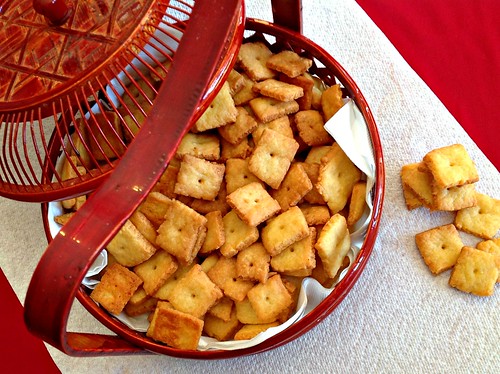
The two crackers I chose to make were graham crackers and Cheez-its! I can assure you that both crackers were loads of fun to make.
You can find the posts on the crackers and their recipes here:
So the main rule of this challenge was to make these crackers by using different rolling and shaping methods for each cracker. I decided to go with the traditional hand rolling and non-traditional icebox shaping methods.
Here I rolled out the dough for the Cheez-its using a rolling pin and cut square shapes using a knife.
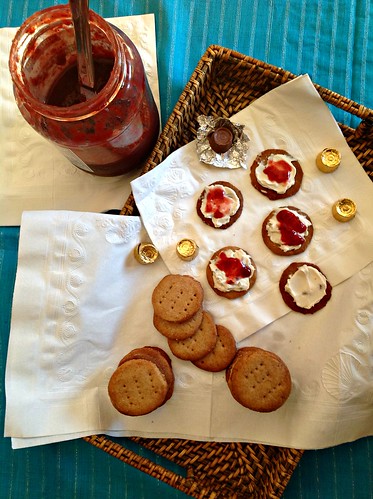
For the graham crackers, I formed the dough into a log shape and chilled it. Then I cut it into crackers by slicing it thinly. This is the non-traditional icebox method of forming the crackers.
Though both methods worked great for me, I can definitely say that I prefer the icebox method. It was a lot faster and less frustrating (no crackers tearing apart the second I try to lift them onto the tray). However, the crackers of the other method were a lot more clean cut and consistent in shape and thickness. I'm sure they would have been even more so if I had used a cookie cutter.
I have to say that I really enjoyed the Daring Baker challenge of this month. It was super fun and something that people normally don't even think of doing. I mean, who makes their own crackers these days? But the results were pleasing and the process was fun. I know I'll definitely be making those Cheez-its again!
Saturday, July 28, 2012
DB July Challenge: Crazy For Crackers
Hello everyone!
Today I'm going to be sharing the second recipe I made on Father's Day with you. The cake, Walnut and Coffee Battenberg Cake, was actually the Daring Baker's challenge for July 2012.
Mandy of What The Fruitcake?! came to our rescue last minute to present us with the Battenberg Cake challenge! She highlighted Mary Berry’s techniques and recipes to allow us to create this unique little cake with ease.
Personally, I found this cake easy to make but making it was such a hassle. So many steps, so many little things to do. I can't say I wasn't pleased with the results though -- the cake was delicious! The recipe and instructions from Mandy are below!
Walnut and Coffee Battenberg Cake
Serves 10-15
Ingredients
You're also going to need 1 cup Marzipan, natural or yellow to finish.
Directions:
1. Preheat oven to 350°F.
2. Grease an 8” square baking tin with butter.
3. Line the tin with parchment paper, creating a divide in the middle with the parchment (or foil).
4. OR Prepare Battenberg tin by brushing the tin with melted butter and flouring.
5. Whisk together dry ingredients (except walnuts and coffee) and combine with the wet ingredients in a large bowl (except vanilla and milk) and beat together just until the ingredients are combined and the batter is smooth.
6. Spoon half the mixture into a separate bowl and stir in the vanilla, 1½ teaspoons milk and chopped walnuts.
7. Spoon the walnut mixture into the one side of the prepared baking tin
8. Dissolve the coffee in the remaining 1½ teaspoon milk and add to the remaining batter, stir until just combined
9. Spoon the coffee batter into the other half of the prepared baking tin
10. Smooth the surface of the batter with a spatula, making sure batter is in each corner
11. Bake for 25-30mins until the cake is well risen, springs back when lightly touched and a
toothpick comes out clean (it should shrink away from the sides of the pan)
12. Leave to cool in the tin for a few minutes before turning out to cool thoroughly on a wire rack
13. Once completely cool, trim the edges of the cake with a long serrated knife
14. Cut each sponge in half lengthways so that you are left with four long strips of sponge
15. Neaten the strips and trim as necessary so that your checkered pattern is as neat and even as possible
Coffee Buttercream
Ingredients:
½ cup Unsalted Butter
2 cups Powdered (Icing/Confectioners') Sugar
½ tsp Instant Coffee
1½ tsp Milk or Cream
16. Combine the buttercream ingredients together and mix until combined.
17. Spread a thin layer of buttercream onto the strips of cake to stick the cake together in a checkered pattern.
18. Dust a large flat surface with icing sugar then roll the marzipan in an oblong shape that is wide enough to cover the length of the cake and long enough to completely wrap the cake.
19. Spread the top of the cake with a thin layer of buttercream.
20. Place the cake on the marzipan, buttercream side down.
21. Spread buttercream onto the remaining three sides.
22. Press the marzipan around the cake, making sure the join is either neatly in the one corner, or will be underneath the cake once turned over.
23. Carefully flip the cake over so that the seam is under the cake and score the top of the cake with a knife, you can also crimp the top corners with your fingers to decorate.
24. Neaten the ends of the cake and remove excess marzipan by trimming off a small bit of cake on both ends to reveal the pattern..
Then you're done! Enjoy and be sure to send me pics of your completed cakes.
Sunday, June 24, 2012
Sun-dried Tomato Pesto and Cheese Panini
Hello everyone,
Here is the first recipe I promised you on Father's Day. Recently, my sister and I went to Panera Bread. She had a tomato and cheese panini while I got a pecan roll... Umm yeah, I gave my mom the pecan roll and ate half of my sister's panini. And then I just could not stop craving more so I had to create my own recipe for it. I think I can safely say that these paninis come pretty darn close to the one I had at Panera Bread.
Sun-dried Tomato Pesto and Cheese Panini
Makes 15-20 panini halvesIngredients
2/3 cup drained oil-packed sun-dried tomatoes
1 1/2 tablespoons of oil from the tomato jar
1/3 cup black olives, pitted and coarsely chopped
2 tablespoons pine nuts
1 clove garlic
1 teaspoon dried basil
1 teaspoon dried oregano
1 teaspoon freshly ground pepper
2 teaspoons salt
garlic salt and garlic powder for flavoring
1 loaf of thinly sliced sourdough bread
1 pound fresh mozzarella, cut into 1/4-inch slices OR 3-4 cups grated mozzarella
2 fresh, sliced tomatoes (optional)
Extra-virgin olive oil, for brushing
Process the sun-dried tomatoes, oil, black olives, pine nuts, garlic, basil, oregano, pepper, salt, and seasoning in a food processor until the ingredients have turned into a paste with a slightly chunky texture.
Spread a tablespoon of the mixture on each slice of sourdough bread and top one slice with around 3-4 tablespoons of grated cheese or one slice of cheese. I also put a little Parmesan cheese on the other slice of bread to suit my personal taste. Feel free to add or subtract from this recipe to suit your own tastes. Place two or three slices of tomato on to the cheese. Press the other slice of bread to complete the panini and brush olive oil on the top.
Grill the panini on both sides until lightly browned. You can also use a panini maker or a sandwich maker with a grill option like I did for the same effect. Slice the panini diagonally across the grilled lines and serve immediately.
Enjoy!
Monday, June 18, 2012
On Father's Day
Yesterday was Father's Day. Normally, we wouldn't celebrate but this one was extra special because my grandpa was with us! My grandpa lives in Pakistan so its a rare day when we have three of our "dads" in the home (grandpa, dad, and uncle). So we held a little celebratory breakfast.
![]() |
| Yeah, we had a lot of things going on... |
I will be sharing a couple of the recipes I made on this day with you all in the next couple of days: Sun-dried Tomato Pesto and Cheese Paninis and Coffee and Walnut Battenberg. :) Until then,
Hello everyone!
Family gatherings usually mean a feast of some sort. This time, my uncle was coming over for dinner, so we decided we would have a KFC dinner. Now, because of religious dietary restrictions, plus my mom being somewhat a health-nut, we don't eat at KFC. That means we had to make the KFC-style dinner ourselves. So today, I am sharing with you my family's take on KFC-style chicken.
Oh, and I do apologize for the lack of good pictures. Late at night = bad lighting = bad pictures. Sorry.
KFC-Style Baked Chicken
Serves 12
Ingredients:
1 tablespoon ginger-garlic paste (freshly ground ginger and garlic)
1/2 cup lemon juice
1 tablespoon salt
12 chicken leg quarters with skin
2 tablespoons black pepper
2 tablespoons salt
2 cups all-purpose flour
2 tablespoon white pepper
1 tablespoon powdered red chilli pepper
6 eggs
Marinate the chicken legs with the ginger-garlic paste, lemon juice, and 1 tablespoon of salt and leave for 1 hour - overnight.
Grease a foil-lined baking sheet and preheat the oven to 400 degrees Fahrenheit.
Combine the dry ingredients in a large bowl and beat the eggs in a separate large bowl.
Roll a chicken piece in the flour mixture until it is fully coated. Brush off any extra clumps of flour. Dip the chicken leg in the beaten egg and once again roll it in the flour mixture until it is fully coated. Dust off any clumps of flour again or they will still be on the chicken once it is baked.
Repeat these steps until all of the chicken pieces are covered in flour and on the tray. Bake the chicken in the oven until it is golden brown (around 40-45 minutes).
Enjoy!
Subscribe to:
Posts (Atom)